Leaking faucets can be an annoyance. Whether you notice it once in a while or it’s a constant problem, we have a few handy tips to help you solve it. Luckily, most leaks are relatively easy to fix. Here are several ways you can tackle that annoying leak in your kitchen.
[ez-toc]
How to repair a leaky kitchen faucet
Before we work on the kitchen faucet, it is a great idea to turn the water supply off. Water is under a lot of pressure and you can flood a room if you don’t shut it off before working on a faucet. You can shut off the water by turning off the main water valve or closing a valve in the room. Once the water is shut off, it’s important to open the faucets and wait for them to completely stop flowing water before beginning a repair.
You will need the following: pliers, hex wrench, wrenches, and a Philips screwdriver.
Faucet leaking can be caused by a loose fitting (or connector), a worn-out washer, or a damaged spout.
If it is the first time that the problem occurs, check if the faucet has been properly closed. Sometimes it can require quite a lot of force to close a faucet completely.
How to repair a loose nut
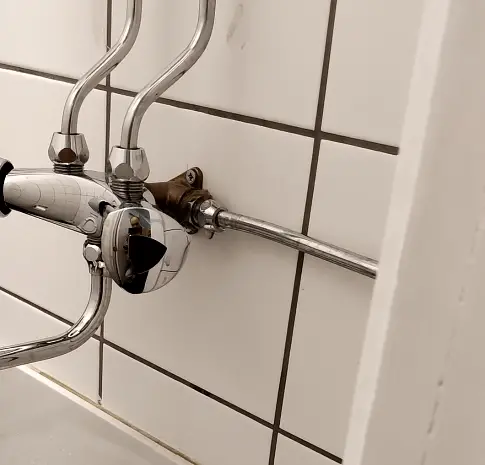
If the fitting is loose (see the photo below for an above), we can just use a wrench to tighten it. Place the wrench on the nut. Rotate the wrench clockwise and see if this helps. Don’t overtighten it though as nuts are not able to handle too much pressure. When we use a faucet, it is possible that over time the nut gets loose and needs some adjustment.
Fixing the faucet itself
We can start by opening up the kitchen faucet. This is often done by removing a small screw and popping the handle off. Once this is done, we should see the mechanism. Sometimes it is possible to remove some dirt from this part and get it fixed. In other instances, you will have to replace some rubber rings (washers).
Most faucets have a small metal plate to close off the water supply. It is possible that this has gotten dirty. We can use a cotton swab to clean it.
If this doesn’t fix it, we can remove the mechanism inside of the faucet (also called the cartridge). This is done by using pliers and pulling them out by turning counterclockwise. It might be needed to remove some screws before that. If you have a faucet from a brand, it might be possible to find a replacement for the cartridge. Most brands allow you to find the parts number by selecting the model number. It can take some searching to find the right model. If you are not able to find it, you can contact the brand and send them a picture. Some brands don’t offer replacement parts and you just have to install a new faucet.
Installing the cartridge is done by turning it clockwise. Be sure to tighten it with a wrench. Once this is done, we can reinstall the handle and test the faucet by turning the water back on. You might have to tighten the cartridge if the handle is in a weird position.
Check if the faucet is still under guarantee. If it isn’t, you might have to get a new one.
How to replace a kitchen faucet
Plumbers will often replace a faucet instead of repairing it. If there is an issue, it can indicate that the faucet has reached the end of its lifetime and that more problems will soon emerge. To avoid having to go back multiple times, plumbers often pick the easier route of just replacing the faucet. Each faucet is also unique and plumbers can’t have all the spare parts in inventory. They also have to keep in mind that faucets are quite cheap and their hourly rate is high so just replacing the faucet can be easier than repairing it. This is something that most DIY’ers can do as well as you just need some basic tools.
Most people want to save money on faucets but cheaper ones are often less durable.
Once you have turned the water supply off, we can open the faucet to remove all the water from the water pipe.
Grab a bucket before you disconnect the connection between the pipe and the faucet as some water can leak out of it. To remove it, you can use a wrench. Rotate counterclockwise to get it to lose. This can require quite a lot of power but be careful that you don’t break the water pipe (sometimes this is a flexible pipe and this is easier to work with). You will also need a socket wrench to get the faucet loose from the sink. The nut to do this is typically reached from under the sink. You can take a picture with your phone if it is hard to see. On some faucets, you may need to remove a plate or cover to access the mechanism.
Once this is done, we can remove the old faucet.
Now we are going to install the new faucet. When you buy this, make sure that it fits the diameter of your water pipes as they come in different sizes. Start by using your socket wrench to tighten the faucet to the sink. Don’t overtighten it as some sinks can break! Once this is done, we can attach the water supply line. If there is a hot and cold water line, make sure that you install them correctly. The connections should be quite tight as water can leak from them if this is not the case.
Next, we can turn on the water supply and test the faucet. If there is a leak, we can turn the water back off and tighten the nut or replace a part. Even if it is just a small drip, you still have to fix it as water can cause a lot of damage.
To conclude, we can state that fixing a faucet is often quite straightforward. In some instances, you just have to replace the faucet to make sure that the issue is completely fixed. This is often a straightforward process that most DIY’ers can do with some basic tools. You just have to make sure that you don’t damage the sink or water pipe. Leaking faucets can be quite expensive as they can spill a lot of water. Even small drips add up over time. For this reason, it is important that you fix a leaky faucet. In this post, we have outlined how you can do this.
